Saturday, March 26, 2011

Extracting Hyperion Financial Management Metadata to Oracle Data Integrator

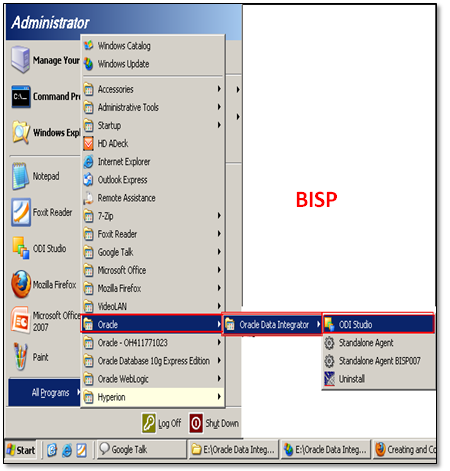
Step: 1) Go to Start--->Program Files--->Oracle--->Oracle Data Integrator explore ODI and login to work repository.


Step: 2) After successfully login to work repository go to Topology Navigator select Physical Architecture Tab and select Technology and expand it. Go to the Hyperion Financial Management Right Click and select ‘New Data Server’.


Step: 3) In the definition tab enter the following details as shown in the picture below:
Name: Appropriate name to data server
Cluster (Data Server): System name
User: User Name
Password: password


Step: 4) Click on Save it will ask you to create physical schema press ‘OK’.


Step: 5) In Technology Tab go to Hyperion Financial Management expand it and select newly create data server Right Click and select ‘New Physical schema’.


Step: 6) In the definition tab enter the HFM Application name to which you want to connect.


Step: 7) Click on Save it will ask you to specify the context press ‘OK’.


Step: 8) Go to the Logical Architecture tab Expand Technologies and select Hyperion Financial Management Right-click and select ‘New Logical Schema’.


Step: 9) Give appropriate name to logical schema and set the Context to Hyperion Financial Management physical schema.


Step: 10) Click on ‘Save’.

Step: 11) Go to the ODI Designer and create new Project with appropriate name.


Step: 12) Click on ‘Save’. You can check in the project tab
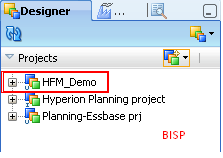

Step: 13) Expand project go to knowledge module right click and import following knowledge modules.


RKM Hyperion Financial Management
LKM File to SQL
LKM Hyperion Financial Management Members To SQL
LKM Hyperion Financial Management Data To SQL
IKM SQL to Hyperion Financial Management Data
IKM SQL to Hyperion Financial Management Dimension
IKM SQL to File Append

Step: 14) Press Ctrl and select all three knowledge


Step: 15) ‘Close’.


Step: 16) Now go to the model tab and create new model folder.


Step: 17) Go to the model tab and create new model.


Step:18) Go to the Reverse Engineer tab select customize check box and enter details as follows:


Step: 19) ‘Save’

Step:20) Newly created Model will be available for Reverse Engineering go to Model tab select Hyperion planning model and Right Click and select Reverse Engineers. Before Reverse Engineer the models make sure your agent services are running if not start it with following command:

C:\oracle\Middleware\Oracle_ODI1\oracledi\agent\bin>agent –NAME=localagent


Step: 21) Now you can reverse engineer it.


Press ‘OK’.


Step: 22) Go to the Operator Tab check whether the Execution run successfully or not.


If all the checks are green that means your model reversed successfully.

Step: 23) Go to the Designer and open model tab expand Hyperion Financial Management model again. You can check all the dimensions are visible there from your HFM application


Done !

Configuring ODI for integrating with Hyperion Financial Management Application

I will be using Single-machine architecture; machine will be hosting ODI and hosting HFM and EPM foundation (Workspace and shared services). I have created a FM application named SAMPLE that is based on the “Simple Demo” information that can be found in “Hyperion\products\Financial Management\Sample Apps\Simple Demo\” of the HFM installation.

The machine is windows based as that is a pre-requisite for HFM and also the HFM client that has to be installed on the ODI machine.
The EPM version installed is 11.1.1.3
We need to perform some work around solutions for integrating ODI 11g with EPMA 11.1.1.3.

Step: 1) Go to directory C:\oracle\Middleware\Oracle_ODI1\oracledi\agent\lib Copy the HFMDriver.dll file and pest it to directory
C:\oracle\Middleware\Oracle_ODI1\oracledi\agent\drivers


Step: 2) If you will use the “Local Agent” you will need to add the driver location to the windows environment variable (Path).
C:\oracle\Middleware\Oracle_ODI1\oracledi\agent\drivers


Once you have added the location make sure you restart all the ODI components to pick up the driver or you will continue to receive the error message.

Friday, March 25, 2011

Creating and Connecting to ODI Master and Work Repositories

The first steps to setting up Oracle Data Integrator are to create the Master repository, connect to the Master repository, create the Work repository, and then connect to the Work repository

Step:1) Connecting to the RDBMS (Oracle 10g XE)

Step:2) Connecting to the RDBMS (Oracle 10g XE)

Step:3) Creating the RDBMS Schema/User (Oracle 10g XE) for the Master Repository

i.On the Oracle Database Express Edition Home screen, select SQL Commands > Enter Command from the SQL drop-down list.

Create the schemas by executing the following SQL commands:
create user identified by ; grant dba, connect, create session to ;

SQL> create user bispmaster identified by password;
SQL> grant dba,connect,create session to bispmaster;

Step:4) Creating the ODI Master Repository


In the URL field, enter the following URL: jdbc:oracle:thin:@bispcognos:1521:xe, and then enter the User as bispmaster and Password as password(This is in our condition). In the Technology field, select Oracle. Click the Test Connection button and verify successful connection. Click Next. Click OK on Master Repository Creation Wizard screen.


The SQL command is executed in the command window. If the Master repository creation is successful, you will see the following message. Click OK. The ODI Master repository is now created.


Step:5) Connecting to the ODI Master Repository

Configure Repository Connections with the parameters provided in the following screen. Click the Test button. Verify successful connection and click OK. Click OK to save the connection.


Select the newly created repository connection (Master Repository) from the drop-down list. Click OK. The ODI Topology Manager starts.


A relational schema must be created for each repository. The following steps walk you through creating the relational schema for the ODI Work repository.


Step:1)Connecting to the RDBMS


If not opened, open the Oracle XE Database Home page: Start > All Programs > Oracle Database 10g Express Edition > Go to Database Home page.


The Login screen appears. Log in to Oracle XE Database as system. The default password is password. Click Login.

Step:2) Creating the RDBMS Schema/User (Oracle 10g XE) for the Work Repository


On the Oracle Database Express Edition Home screen, select SQL Commands > Enter Command from the SQL drop-down list.


Create the schemas by executing the following SQL commands:
create user identified by ; grant dba, connect, create session to ;

SQL> create user bispwork identified by password;
SQL> grant dba,connect,create session to bispwork;

Step:3) Creating the ODI Work Repository

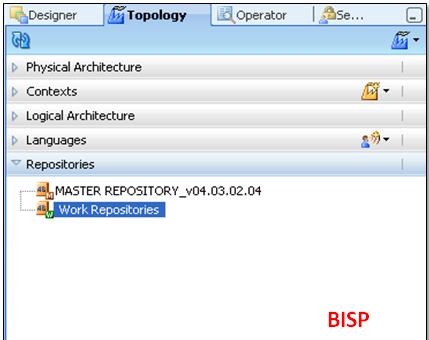
In ODI, click the Topology Navigator tab and then click to the Repositories panel. Right-click the Work Repositories node and select New Work Repository. The Create Work Repository Wizard opens.


In the screen that follows, enter the parameters shown in the following screen. Click the Test button. Verify successful connection and click OK. Click Next.


In the Create Work Repository Login window, click Yes. Enter the Login name: WORK_REPO as shown on the screenshot. Click OK. Verify that the newly created Work repository is now in the work repositories tree view


Now you disconnect from the Master repository and connect to the Work repository. Click ODI menu and select Disconnect "Master Repository".


Click Connect to Repository. Select “WORK_REPO” from the Login Name drop-down list. Enter Password: SUNOPSIS. Click OK. Click the Designer tab. The following ODI Designer screen appears.


Done !